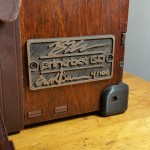
 Since before I even owned the GO! (v.1), I had a vision in my mind about turning it into a steampunk steamer trunk kinda thing, and critical to that vision were suitcase belts. I can't imagine a single feature (well, in addition to darkly stained wood) that says "olde timey" like leather belts up the sides of a piece of a luggage, so I knew I needed to get something like that working for me at some point.
I got held up for some time on the idea of finding straps that were actually designed Read more [...]
Since before I even owned the GO! (v.1), I had a vision in my mind about turning it into a steampunk steamer trunk kinda thing, and critical to that vision were suitcase belts. I can't imagine a single feature (well, in addition to darkly stained wood) that says "olde timey" like leather belts up the sides of a piece of a luggage, so I knew I needed to get something like that working for me at some point.
I got held up for some time on the idea of finding straps that were actually designed Read more [...] printrbot GO – suitcase belts and signature panel
Since before I even owned the GO! (v.1), I had a vision in my mind about turning it into a steampunk steamer trunk kinda thing, and critical to that vision were suitcase belts. I can't imagine a single feature (well, in addition to darkly stained wood) that says "olde timey" like leather belts up the sides of a piece of a luggage, so I knew I needed to get something like that working for me at some point.
I got held up for some time on the idea of finding straps that were actually designed Read more [...] 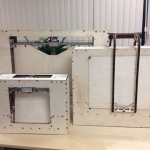 For those of you who aren't tired of hearing me say it, I'm still claiming to be the only owner of an original Printrbot GO (outside of insiders that is - Brook, Ben and maybe one other person at Printrbot have one that I know about). Shortly after I purchased mine, the model was discontinued in fact and Brook said when he pulled it that he planned to refine the design and come out with a v2. Well, it finally happened.
http://www.youtube.com/watch?v=uyyzDeJ2piY
Brook started with the
For those of you who aren't tired of hearing me say it, I'm still claiming to be the only owner of an original Printrbot GO (outside of insiders that is - Brook, Ben and maybe one other person at Printrbot have one that I know about). Shortly after I purchased mine, the model was discontinued in fact and Brook said when he pulled it that he planned to refine the design and come out with a v2. Well, it finally happened.
http://www.youtube.com/watch?v=uyyzDeJ2piY
Brook started with the 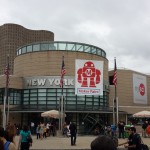 It will perhaps not surprise you that I spent most of my time at Maker Faire ogling the various 3d printing displays. Although that is what I will focus on in this post AND these beasties have surely taken over huge chunks of land at Maker Faire in recent years (based on what I've been told, this was my first Maker Faire), there is a lot going on at Maker Faire that is NOT 3d printing related believe it or not and I'm sure that folks interested in just about anything geeky, hacky, oddball and
 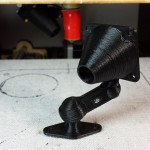 So after my last round of functional but peripheral upgrades (getting all the tools into handy locations) I decided it was time to focus some time and effort on the printing performance of the bot (an idea that felt almost novel after all of the aesthetic mods I'd otherwise been consumed by recently).
It was clear to me that the motion in the Z direction could use some refinement because the x-axis carriage seemed to wobble back and forth a little bit when raising or lowering the extruder manually.
So after my last round of functional but peripheral upgrades (getting all the tools into handy locations) I decided it was time to focus some time and effort on the printing performance of the bot (an idea that felt almost novel after all of the aesthetic mods I'd otherwise been consumed by recently).
It was clear to me that the motion in the Z direction could use some refinement because the x-axis carriage seemed to wobble back and forth a little bit when raising or lowering the extruder manually.