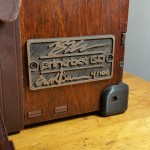
 Since before I even owned the GO! (v.1), I had a vision in my mind about turning it into a steampunk steamer trunk kinda thing, and critical to that vision were suitcase belts. I can't imagine a single feature (well, in addition to darkly stained wood) that says "olde timey" like leather belts up the sides of a piece of a luggage, so I knew I needed to get something like that working for me at some point.
I got held up for some time on the idea of finding straps that were actually designed Read more [...]
Since before I even owned the GO! (v.1), I had a vision in my mind about turning it into a steampunk steamer trunk kinda thing, and critical to that vision were suitcase belts. I can't imagine a single feature (well, in addition to darkly stained wood) that says "olde timey" like leather belts up the sides of a piece of a luggage, so I knew I needed to get something like that working for me at some point.
I got held up for some time on the idea of finding straps that were actually designed Read more [...] printrbot GO – suitcase belts and signature panel
Since before I even owned the GO! (v.1), I had a vision in my mind about turning it into a steampunk steamer trunk kinda thing, and critical to that vision were suitcase belts. I can't imagine a single feature (well, in addition to darkly stained wood) that says "olde timey" like leather belts up the sides of a piece of a luggage, so I knew I needed to get something like that working for me at some point.
I got held up for some time on the idea of finding straps that were actually designed Read more [...]  I've been putting off this post thinking that I wanted to "perfect" my setup before making it more public, but I haven't had all that much time to work on it lately and my vision for where I want to go with the hardware has escalated considerably (vaguely hinted at at the end of the post), so I decided to go ahead and write it up for now in the hopes of encouraging others to explore this route. It's a very hot topic in the 3d printing world these days so hopefully my experiences with this particular
 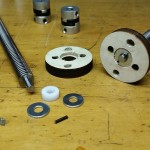 Oldham couplers, if you're reading this, it wasn't your fault. It was mine. I didn't understand you. You were perfect. Will you ever forgive me?
So while deeply lost in thought about completely redesigning the gantry for the GO v.1 and agonizing over what kind of couplers really are best for my bot, a helpful chap on Google+ (+Joe Spanier) said, "Oldham couplers HAVE to have thrust bearings... to work correctly."
Of course this makes sense. Oldham couplers are only designed to transmit
Oldham couplers, if you're reading this, it wasn't your fault. It was mine. I didn't understand you. You were perfect. Will you ever forgive me?
So while deeply lost in thought about completely redesigning the gantry for the GO v.1 and agonizing over what kind of couplers really are best for my bot, a helpful chap on Google+ (+Joe Spanier) said, "Oldham couplers HAVE to have thrust bearings... to work correctly."
Of course this makes sense. Oldham couplers are only designed to transmit  Ok, it's time to man up and say I was wrong. Soo wrong.
The intial test prints after installing my cheapie Oldham couplers were glorious. They represented such a dramatic improvement over my previous prints as far as Z wobble goes that I was convinced that I'd found the be-all-end-all solution for Z wobble. I'd been using them for about a week when I started to notice some strange Z artifacts creeping back into my prints however. The layers were shifting along the Y axis as before, but
Ok, it's time to man up and say I was wrong. Soo wrong.
The intial test prints after installing my cheapie Oldham couplers were glorious. They represented such a dramatic improvement over my previous prints as far as Z wobble goes that I was convinced that I'd found the be-all-end-all solution for Z wobble. I'd been using them for about a week when I started to notice some strange Z artifacts creeping back into my prints however. The layers were shifting along the Y axis as before, but  First, a disclaimer: I'm going to talk a lot about something that I will mostly call Z wobble in this post. I know there are folks in the RepRap community with strong ideas about what Z wobble really means as opposed to Z ribbing or various other artifacts and anomalies found on the vertical sides of printed walls, so please forgive me if I'm using the language incorrectly. What I will be talking about is the side to side shifting of layers caused (at least in part) by the threaded rods pushing
  For those of you who aren't tired of hearing me say it, I'm still claiming to be the only owner of an original Printrbot GO (outside of insiders that is - Brook, Ben and maybe one other person at Printrbot have one that I know about). Shortly after I purchased mine, the model was discontinued in fact and Brook said when he pulled it that he planned to refine the design and come out with a v2. Well, it finally happened.
http://www.youtube.com/watch?v=uyyzDeJ2piY
Brook started with the
For those of you who aren't tired of hearing me say it, I'm still claiming to be the only owner of an original Printrbot GO (outside of insiders that is - Brook, Ben and maybe one other person at Printrbot have one that I know about). Shortly after I purchased mine, the model was discontinued in fact and Brook said when he pulled it that he planned to refine the design and come out with a v2. Well, it finally happened.
http://www.youtube.com/watch?v=uyyzDeJ2piY
Brook started with the