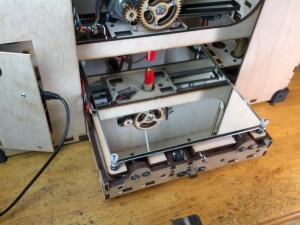
After printing on an aluminum bed up to now (with an 8 x 8 Kapton square), I decided to install a mirror printbed I had purchased a while back. I had wrestled with the best printbed material for the GO for some time before giving up and deciding to try both. The GO being a mobile platform, it makes for some strong arguments in favor of aluminum. No matter how gingerly I secure a piece of glass inside the thing, a good knock when traveling could bring me seven years of bad luck. And there is also the issue of weight. Whatever goes in the bot has to be carried by yours truly at some point, and an aluminum plate is a little lighter too.
The problem however is that the piece of aluminum I’ve been using is only 1/8″ thick and it seems like it warps a little when it gets up to temperature (perhaps as much as a two tenths of a millimeter from the corners to the center). While I could probably reduce this warpage by freeing up the corners a little bit (so the linear expansion has somewhere to go), that might also introduce some slop if I’m printing on the bed when cold (not the sure the springs underneath and nylon thumb screws on top will keep it totally stationary during a print). I haven’t given up on the aluminum bed at all mind you, I’m just thinking out loud here.
Glass is frequently used for printbeds because it is very flat, hard (durable) and has a nice low coefficient of thermal expansion. While some folks insist that tempered glass is necessary because of the heating and cooling cycles, others have had good luck with plain old glass for extended periods of time. Mirrors in particular are sometimes recommended, the thinking being that the mirrored surface will help bring it up to temperature more quickly and/or keep the temperature more stable. Sounds good anyway.
I ordered a custom piece in 3/16th inch thickness at the same time I ordered the piece of aluminum but was dragging my feet about how to secure the thing. Most folks seems to use strong binder clips to secure it to the heated bed, but with the tight clearance around the bed of the GO that didn’t seem like an ideal option. And since I had ordered the glass large enough to (almost) cover the securing screws on the corners of the bed anyway, I decided to try to drill/grind precisely sized semi-circular cutouts into the corners of the mirror for a secure fit using the existing screws and nylon thumb nuts.
It turns out that drilling through glass with a specially made diamond coated drill bit (more like a tiny hole saw really) is doable, although it was made more challenging since I was only drilling out an incomplete circle at each corner. After some back and forth for size and spacing and with only a small amount of fracturing on the bottom edge I was able to get a decent fit. The Sherline (converted for milling) came in handy here so I could securely hold the mirror to the milling bed, advance the drilling bit very slowly and keep it dowsed with water for cooling while cutting at the same time.

There are a few more items that remain on my printrbot GO todo list (it seems to be growing) before I tear it apart and stain it. I plan to print a knob and latch for the front door, some kind of low-profile latch for the inside of the back doors and a new suitcase handle, but on the functional side I’ve got to figure out a good way to stabilize the Z guide rods. The rattling sound they make at the top of the bot during a print is pretty outrageous at times and is surely compromising the detail and cleanliness of lines.
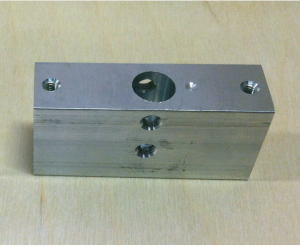
Before I had settled on what to do about it exactly, I noticed these aluminum blocks on the printrbot website.

Brook and the team seem to have been working feverishly on updating and upgrading their whole line of products, cranking out the LC v2 and Plus v2 recently as well as just introducing the intriguing “Simple” (in beta release until May 20th). These are some beautifully sturdy looking upgrades and to add rigidity to the Z guide rods, they’re using these aluminum blocks with set screws.
When I asked Brook if these things might work for the GO, he replied that he hadn’t thought about it but offered to send me some so I could find out for myself. Awesome. If they look like they’ll work on the upper and lower portion of the rods (if there’s enough room inside the box for them basically) then I think I’ll purchase another pair for the other side for maximum rigidity. You know I’ll tell you all about it.